
In this lab, you will create two security groups and then launch two instances (one Windows and one Linux). You will then log into the instances. Additionally, you will create an EC2 key pair that will be used to authenticate to the instances.
What you need
To complete this lab, you need:
- Latest version of Chrome
- An AWS account and login with permissions to use EC2 and VPC
- An SSH client application. If you are using a Linux or Mac workstation, then an SSH client is built in. If you are using Windows, see the AWS setup lab for instructions on installing the PuTTY SSH client.
In this lab, you will:
- Create two security groups
- Create an EC2 key pair
- Launch one Windows and one Linux instance
- Connect to the Windows instance using remote desktop
- Connect to the Linux instance using SSH
AWS uses security groups to control network access to virtual machine instances. Security groups act like firewall rules and allow access based on source IP address and destination port number.
Step 1
Start Chrome and log into your AWS account using an IAM user that has permissions to administer VPC and EC2.
If you don't know how to do this, then complete the Getting Started with AWS lab before doing this one.
Step 2
Switch to the EC2 dashboard by selecting Services | EC2.
Verify your region is set to N Virginia by selecting it from the region dropdown in the upper-left corner of the AWS management console.

Step 3
Click the Security Groups link on the left side.
Step 4
Click the Create Security Group button.
Step 5
Provide the following values:
- Security group name: SSH-HTTP
- Description: Security group to allow SSH and HTTP
- VPC: Select the VPC just created
Step 6
Verify the Inbound tab it selected and notice currently there are not any rules.
Step 7
Click the Add Rule button.
Step 8
In the Type column, select SSH from the drop-down menu, and in the Source column, select My IP.
Step 9
Click the Add Rule button again and create another rule that will allow HTTP traffic from a source of Anywhere.
Step 10
Click the Outbound tab and notice there is one rule provided by default that allows all traffic on all ports.
Step 11
Click the Create button.
Step 12
Click the Create Security Group button again and create another security group named RDP-HTTP and be sure to set the VPC to your VPC. Provide a Description of your choice.
Step 13
Add the following inbound rules to the new security group and click Create:
- RDP from your IP address
- HTTP from anywhere
An EC2 key pair is an RSA public/private encryption key pair that is used to authenticate to the Linux instances or decrypt a Windows password.
Step 1
From the Services menu, choose EC2.
Step 2
Click Key Pairs on the left, then click the Create Key Pair button.
Step 3
Provide a name of LabKeyPair and click the Create button.
Step 4
Chrome will automatically save the file in your Downloads folder without prompting, but some browsers will prompt. If prompted, select to save the file.
Step 5
Look in your Downloads folder and verify there is a file named LabKeyPair.pem.
If you are using Windows, you will use the PuTTY SSH client to be able to connect to Linux. If you do not have PuTTY installed, see the AWS setup lab for instructions on installing the PuTTY SSH client and PuTTYgen key utility.
The EC2 key that was just generated by AWS was downloaded as a PEM encoded file that contains both the public and private keys. The PuTTY application requires the private key in a different format. You will now use PuTTYgen to convert the PEM encoded EC2 key pair just downloaded to a PPK file required by PuTTY.
Step 1
Start PuTTYgen.
Step 2
Click the Load button.
Step 3
Set the file type dropdown to All Files (*.*)
Step 4
Select the LabKeyPair.pem file in the Downloads folder and click Open, then click OK.
Step 5
Click the Save private key button and click Yes.
Step 6
Save the key as LabKeyPair.ppk in the same folder.
The LabKeyPair.ppk file can now be used by PuTTY to create a secure SSH connection.
Step 1
Switch back to the web browser logged into AWS and verify you are still on the EC2 dashboard or select Services | EC2 to switch to the EC2 dashboard.
Step 2
Click the Instances link on the left and then click the Launch Instance button.
Step 3
On the Quick Start tab, scroll down and locate a Windows 2016 image with SQL Server Express, and click the Select button for that image.
Step 4
On the Choose an Instance Type screen, select t2.micro. Please be sure to read the Important information box above this step concerning the t2.micro instance type before proceeding.
Click Next: Configure Instance Details.
Step 5
On the Configure Instance Details screen, provide the following values:
- Number of instances:
1 - Network: Select the VPC created earlier
- Subnet: Select one of your subnets created earlier
- Auto-assign Public IP: Enable
- Leave the remaining fields as the default values and click Next: Add storage
Step 6
On the Add Storage screen, notice the size and type of the root volume for the instance. Notice you can change the hard drive type to be either magnetic or SSD media type. Feel free to choose either type, but SSD drives cost about twice as much as HDD drives. Leave the size as the default and click the Next: Add tags button.
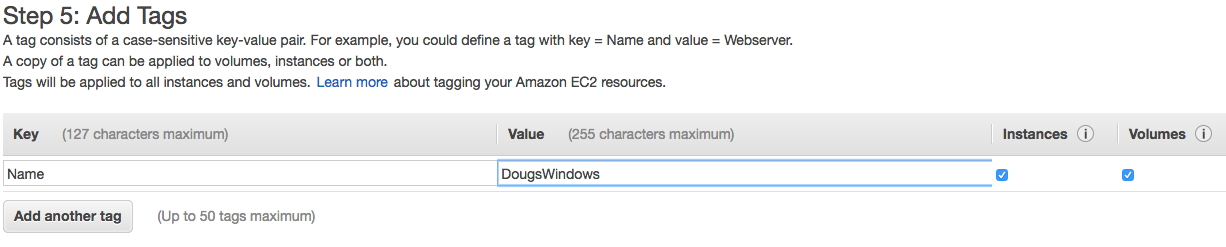
Step 7
On the Add Tags screen, click the Add Tag button and create a new tag with a Key=Name and a Value=[your-name]Windows. It is important that the key is Name, with a capital "N".
The screen should look similar to:
Step 8
Click the Next: Configure Security Group button.
Step 9
On the Configure Security Group screen, choose Select an existing security group and select the security group named RDP-HTTP created earlier. Click the Review and Launch button.
Step 10
If you see a Warning about not being able to connect to the instance on port 1433, this warning is because the AMI you selected has SQL server installed and we have not opened the SQL Server port number (1433) in the security group. This is OK as we do not want outside access to the database.
Click the Continue button.
Step 11
In the Review Instance Launch screen, click the Launch button.
Step 12
In the Select an existing key pair or create a new key pair dialog, select the Choose an existing key pair, select the key pair you created earlier, check the checkbox, and click the Launch Instance button.
Step 13
In the Launch Status screen, click the View Instances button to view all current instances.
You should see a table displaying the instance you just started.
In this section, you will launch a Linux instance. The steps are very similar as launching a Windows instance.
Step 1
From the EC2 dashboard, click the Launch Instance button.
Step 2
Complete the launch instance process just like was done for the Windows instance, but using the values below:
- AMI: Amazon Linux AMI (the first one listed)
- Instance type: t2.micro
- Number of instances:
1 - Network: Select the VPC created earlier
- Subnet: Select one of your subnets
- Auto-assign Public IP: Enable
- Tags: Key=Name, Value=Linux
- Security Group: SSH-HTTP
- Key Pair: LabKeyPair
Step 3
When done launching, click the View Instances button.
Step 4
Press the Refresh  until the Linux instance has a state of Running.
Step 5
Select the Linux instance in the instance table. On the bottom of the screen, locate the IPv4 Public IP address. Highlight and copy this address.
Step 6a - For Windows Users
- Start PuTTY
- In the Host Name (or IP address) field, paste the IP address just copied
- On the left side, expand SSH, click Auth, click the Browse button, select the .ppk file you created earlier (it should be in your Downloads folder)
- Click Open to connect to the instance running in EC2
- Click Yes if a PuTTY Security Alert is displayed
- When prompted, type
ec2-useras the username and press <Enter> - You should now be logged in to the Linux instance
Step 6b - For Mac or Linux Users
- Open a terminal (command prompt) window
- Change into the Downloads folder, or whichever folder you saved the encryption key
.pemfile earlier - Type the following command to change the permission of the .pem file:
chmod 400 LabKeyPair.pem
- Type the following command to SSH to the Linux instance in EC2:
ssh -i LabKeyPair.pem ec2-user@<public-ip-just-copied>
- You should now be logged in to the Linux instance
Step 7
Feel free to explore the Linux instance. For example, you can list all processes running with: ps axu
Step 8
Leave the Linux instance running, you will need it again later.
Step 1
Switch back to the web browser logged into AWS and verify you are still viewing the EC2 instances table or select Services | EC2 and click the Instances link to display the instances table.
Step 2
Select the Windows instance in the instance table. On the top of the screen, click the Actions button and select Get Windows Password.
Step 3
In the Retrieve Default WIndows Administrator Password dialog, click the Choose File or Browse button, open the .pem file you downloaded earlier (it should be in your Downloads folder) and click the Decrypt Password button.
Step 4
Highlight and copy the password displayed. This is the Administrator password for the Windows instance you launched. Paste this password into a text document so you can quickly access it again.
Step 5
Click the Close button to close the password dialog.
Step 6
Near the top of the screen, click the Connect button, and then click the Download Remote Desktop File button. This will download an RDP shortcut file. Chrome should save the file automatically, but if prompted select to save the file.
Click the Close button.
Step 7
Double-click the .rdp file just downloaded. It should automatically open the Remote Desktop client and connect to the public IP address of the instance. Click Connect if warned about a certificate.
Step 8
Log in with the username Administrator and the password decrypted earlier. Try pasting the password, but this may not work. If not, you will need to type the password by hand.
Step 9
You should now be logged into the Windows instance. Feel free to explore the instance.
Step 10
It is recommend to change the password. Feel free to do that, but do not forget the new password!
Step 11
Record the password for your Administrator account. If you did not change the password, be sure to record the password assigned by AWS.
Step 1
Terminate any instances you have. You are being charged for them as long as they exist.

This lab was provided by ROI Training and was adapted from our course, Deploying Infrastructure on Amazon Web Services.
Check out some related courses:
Please click the link below and give us some feedback on this lab. You will automatically be entered to win a new Google Home.