
In this lab, you will create a new VPC network with a single public subnet. Additional subnets will be added to the VPC. Additional subnets that are manually created are always private by default, meaning they do not have a route to the Internet Gateway. The route table will be modified to add a route to the Internet Gateway and make the subnets public.
What you need
To complete this lab, you need:
- Latest version of Chrome
- An AWS account and login with permissions to use EC2 and VPC
In this lab, you will:
- Use the VPC wizard to create a VPC with one public subnet
- Add an additional subnet in a different availability zone
- Modify the route table to make the subnet public
- Everything created in this lab will be needed in the future labs
Step 1
Start Chrome and log into your AWS account using an IAM user that has permissions to administer VPC and EC2.
If you don't know how to do this, then complete the Getting Started with AWS lab before doing this one.
Step 2
Select Services | VPC.
Step 3
Verify your region is set to N Virginia by selecting it from the region dropdown in the upper-left corner of the AWS management console.

Step 4
Click the Start VPC Wizard button.
Step 5
Verify the tab VPC with a Single Public Subnet is selected and click the Select button.
Step 6
On the Step 2: VPC with a Single Public Subnet screen, provide the following values:
- IPv4 CIDR block:
10.1.0.0/16 - IPv6 CIDR block: No IPv6 CIDR Block
- VPC name:
LabVPC - Public subnet's IPv4 CIDR:
10.1.1.0/24 - Availability Zone: Select any availability zone
- Subnet name:
LabPublicSubnet1
Leave the remaining fields as the default values and click Create VPC.
Step 7
Click OK when the VPC is created.
Step 8
On the left side of the screen, click the Subnets link.
Step 9
In the table, select the subnet just created by clicking it.
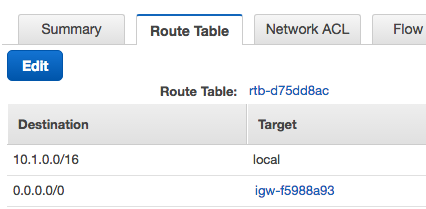
Step 10
Click the Route Table tab that is below the table of subnets (don't click the Route Tables link on the left side). The Route Table should look similar to below:
Step 11
Click the Create Subnet button near the top of the console, and provide the following values:
- Name tag:
LabPublicSubnet2 - VPC: Select the VPC just created
- Availability Zone: Select a different zone than selected for first subnet
- IPv4 CIDR block:
10.1.2.0/24 - Click the Yes, Create button.
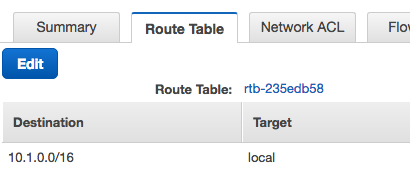
Step 12
After the subnet is created, verify the new subnet is selected in the table and view the Route Table tab. It should look similar to below:
Step 13
In the Route Table tab, click the Edit button. There should be two choices in the Change to drop-down menu. These two route tables were created by the VPC wizard.
Step 14
Change the Route Table to the one from the first subnet. It will be the route table that contains an Internet Gateway (igw).
Step 15
Click the Save button.
Step 1
Verify you are still on the AWS console screen displaying the Subnets.
Step 2
Select your LabPublicSubnet1 by clicking it. Verify you only have one subnet selected.
Step 3
Click the Subnet Actions button and select Modify auto-assign IP settings.
Step 4
In the Modify auto-assign IP settings dialog, check the Enable auto-assign public IPv4 address checkbox and click the Save button.
Step 5
Repeat the previous four steps and enable auto-assign Public IP for your LabPublicSubnet2.
You have just created a VPC with two public subnets. VPC subnets reside within a single availability zone, so it is important to always have at least two subnets in your VPC. This will allow instances in your VPC to be in two different availability zones for availability.
Most regions in AWS have more than two availability zones. It is often desirable to use as many availability zones as possible. In this part of the lab, you will add another subnet to your VPC in another region.
Step 1
Create a third subnet in your VPC. Use the CIDR block 10.1.3.0/24 and be sure to place it in an availability zone not yet used by your other two subnets.
Step 2
Make the new subnet a public subnet by changing the route table to the one with the Internet Gateway.
Step 3
Enable auto-assign public IP addresses on the subnet.

This lab was provided by ROI Training and was adapted from our course, Deploying Infrastructure on Amazon Web Services.
Check out some related courses:
Please click the link below and give us some feedback on this lab. You will automatically be entered to win a new Google Home.